
What you need:
- glass block from Hobby Lobby or Michael's (They are cheaper at Hobby Lobby - $9.99, and I buy mine when glassware is 50% off, or use a 40% off coupon.)
- vellum scrapbook paper, with or without design
- stickers to spell your message, or a Cricut to cut the letters out
- ribbon for the edges & to tie around the block
- lights for inside the block (I will show you the kind below.)
- Mod Podge
- foam brush
 2. Place your words on the block in your desired layout. You can either use stickers or cut the words with your Cricut. If you cut them with your Cricut, you can either cut them on vinyl and apply them directly, or cut them on scrapbook paper and glue them on.
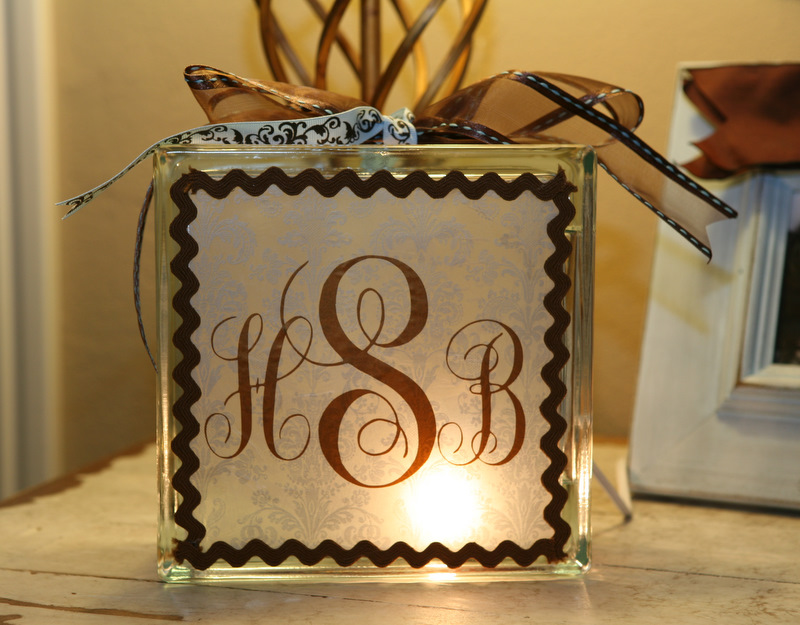
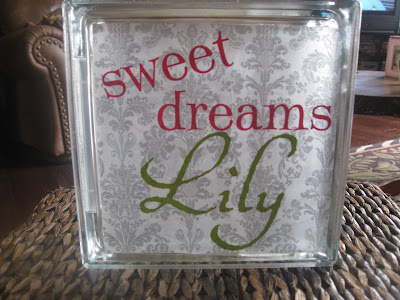 3. Frame the edges of the paper by hot gluing some type of ribbon down.
4. The side of the block has a removable piece of plastic. Take that off and insert lights in the block. (I never put the plastic cover back on because I tie ribbon around the block at the end.) I prefer C7 lights, which are basically 3 large Christmas bulbs, because the cord has an on/off switch. 
 However, it's hard to find these except for Christmas time, though there are some places you can order them online. If you can't find them, then I have used a 20 or 30 count white strand of lights, again from Hobby Lobby. They have these displayed next to the glass blocks year round. My Hobby Lobby also recently started selling a single light, which is what I've been using lately and it works fine.
5. Finally, finish it off by tying a ribbon around the block. Here is the finished product with the lights off, and then with the lights on.


Hope you enjoyed this tutorial! Happy crafting. :)


I love this! Great idea!!
ReplyDeleteLove this!! Thanks for the idea :) I made the glitter balls you had on here for Christmas and they were a big hit!!
ReplyDeleteWhat a wonderful gift!! Thanks for sharing & I can't wait try it out. Happy days ahead...can't wait for a baby update!
ReplyDeleteWhat a cute idea, I am going to have to try this for sure!
ReplyDeleteSo CUTE!
ReplyDeleteA friend gave me one of these for Christmas and I love it!
ReplyDeleteLove this! Definitley will keep it in mind for a cute, personalized gift. Very pretty!
ReplyDeleteWhat a wonderful idea! I don't have a Cricut, but I'd figure something out.
ReplyDeleteI'm bookmarking this for Christmas presents, shower gifts, who knows!
I don't comment much, but I just wanted to say that I love your blog and I have been following it for a long time! You are so crafty and I can't wait to try some of your awesome crafts!
ReplyDeleteOh I love it, I just love it!!! Sooooo cute! Visiting you from A Soft Place. I hope you stop by my blog on Monday's for a linky party and a meet and greet on Fridays.:)
ReplyDeleteI'm going to go follow you now. :)
This is so sweet! I'll be featuring this on Friday-hope you don't mind.
ReplyDelete-Crystal
crystalscraftspot.blogspot.com
Sarah, that is the sweetest thing!!! I have seen those blocks at HL and wondered what to do with them. :) What a fabulous gift. :)
ReplyDeleteThanks for linking this up to my "I {Heart} My Crafty Cutter" party. Have fun finding some neat crafty inspiration, and I hope you'll visit Serenity Now again soon. :)
I never would of thought to use a glass block like that! Love it.
ReplyDeleteThis is one of the cutest crafts I have ever seen--thanks for sharing! I just posted the link on my organization blog. Thanks again!
ReplyDeleteLoved your idea and knew my readers would! Gave you a shout out!! Love following your blog :)
ReplyDeletehttp://johnhoodfamily.blogspot.com/2011/03/beautiful-homes-beautiful-ideas.html
This is sooo cute!! I'm definitely trying this out.
ReplyDeleteI love this and really wanted to make one for a pregnant friend's nursery, but I have a few questions. I simply cannot get the vellum to lay flat no matter what I try. I followed your directions using Mod Podge on both the block and the vellum to no avail. But mine is full of wrinkles. Any tips? Also, I used my Cricut to cut out vinyl letters, but they won't stick to the vellum. They just stay put right on the transfer paper. In your example, did you use transfer paper, or did you just eyeball it by peeling and sticking yourself?
ReplyDeleteI am going to table this project for this particular friend, but I have another shower in a couple of weeks to try again. Thank you so much!
I am trying this too and mine is full of wrinkles! :( Any suggestions? What type of Mod Podge do you use? What do you apply it with?
ReplyDeleteIf it's full of wrinkles, just try to push them out from the center right after you put the paper down. You won't be able to get them all out, but you'll notice as it dries, the wrinkles just work themselves out. There might be a few small ones left, but I think it just adds texture to it. I just use regular Mod Podge and apply it with a foam brush. Hope that helps!
ReplyDeleteI am going to try this as soon as I get some mod podge,I have everything else. I am so excited.I am making one for my grand daughters birthday. I'll let you know know how it turns out.
ReplyDeleteSarah, I'm trying to do this very same thing with the single light bulb from Hobby Lobby, but I can't get the light to sit correctly. How do you keep your light in place and do you still not use the clear circle piece with the single bulb? Any suggestions will help. thank you!!
ReplyDeleteHi Chas,
ReplyDeleteThe light bulb can be hard to place. I usually just play with it a little bit until I get it how I want it, but it does shift over time and I think that's okay. And no, I don't use the clear circle piece. Hope that helps some. Good luck! :)
Sarah
Hi, so cute! I was just wondering where you find the designed vellum paper? I can only find color or clear:(
ReplyDeleteHi, I think this is so cute! My only question is, I can not find that kind of vellum paper:/ Michaels and hobby lobby, I have only found clear vellum paper. Where can I find some like the one you have in the photos?
ReplyDeleteThanks so much Veronica! I purchased my vellum with a design at Hobby Lobby. It was with the single sheet 8.5x11 scrapbook paper. Hope that helps! :)
DeleteYou are a genius i must say,. www.christmaslightdecorators.com
ReplyDelete